
AquaDrive Thrust Collar
As your KE52′ begins to age, you may discover that the mounting bolts holding your AquaDrive thrust collar have started to loosen . They should be checked periodically but avoid over tightening them as most of them are lagged into hardwood. You don’t want to create a problem that’s not there. If you discover, even with a visual check, that some have loosened and are potentially stripped out, the following procedure will be of assistance.
For the horizontal lag bolts on the inboard stringer, the best solution would be to use a through bolt from the mounting bracket to the other side of the stringer. We can suggest two options.
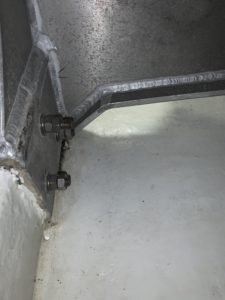
Horizontal Through Bolts
- Option 1 would be to use large over-sized washers on the inside part of the inboard stringers, where the nuts would go to spread the load on the stringer.
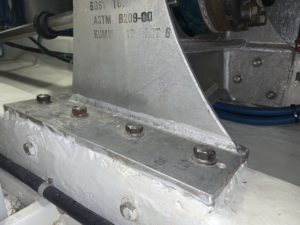
- Option 2, the preferred plan, would be to use backing plates to best spread the load. If you do not know of any machine shops in your area to do this, we have a great machine shop here in Fort Pierce that would be able make those for you. We would just need a simple sketch with measurements for the size of the plate. You could either drill the holes yourself or if you’re confident in the locations, provide those as well and we can drill slightly oversize holes.
If you did not want to go this route, with through bolts, the repair procedure to the horizontally run lag bolts would be the same as the vertical which follows. Outboard stringers are always lagged, vertical and horizontal, so the following pertains to those as well.

Horizontal Lag Bolts
Vertical Lag Bolts
For the lag bolts that run vertically, you should get slightly larger lag bolts to help fill some of the void caused by the currently stripped ones. To re-bed the bolts, the best course of action is as follows.
- Drill out the aluminum plate to allow slightly larger lag bolts to pass through. Use a stop collar on the drill bit to ensure you’re not going too deep.
- Use a slow cure epoxy resin and fill the holes, probably half-way or so. Use your judgement on the amount. You’ll want a small amount of epoxy to be oozing out the top of the hole as you screw each bolt in. Slow cure, of course, will ensure it doesn’t set up before you can get the bolts in.
- Immediately, while the epoxy resin is still wet, coat the new slightly larger lags with the same slow cure epoxy resin and thread down into the holes. Take care not over-tighten to avoid stripping out the new holes. As a guide, stop tightening just as the lock washers flatten out.
- Allow adequate curing time, as instructed by the manufacturer of the epoxy resin, before running the boat.
- Do not retighten the bolts once you’ve set them in place.
- Use acetone to remove any excess epoxy resin that may be pushed up and out of the holes and onto the lag bolts before it cures.
If you have any questions, concerns, or need assistance, feel free to call us. We are ALWAYS here for you!